

Mind mapping is a learning technique that was introduced somewhere in the 1970s by Tony Buzan and ever since, it has proved to help people with mastering any topic by a staggering 10-15%. The concept is simple, instead of creating long documents that are hard to follow, you structure all the data that's related to the topic in so called "nodes" which can be then rearranged to look neat and structured. However creating mind maps is not an easy task and in this article, we will go through some of the best practices that will help you with that. So the first thing when you are making a mind map is to always start with one central node. This might be something you feel is obvious but a lot of people tend to start with placing all the thoughts that come to their minds, that's not the way to go. The thing is mind mapping is about exploring what you already know and expanding on your knowledge by researching further and you won't get anywhere if you throw out everything at once. So start with one main idea and slowly branch out what you know, start with the first topics that connects to the main node, then another and then another. This strategy should be applied to all nodes as you go forward so put as many ideas as you can possibly think up but make sure they have a parent to relate to. When you have the basic structure ready, it's time to start expanding on the topics, this is the research stage. This is the moment you start actually learning from the mind map because you are digging deeper to find new information and that action alone can teach you more than any article ever will. So how do you start? Begin by defining what you want to research, google the topic and start downloading any useful pdfs, images, videos or articles that you find. Once you have a good database of resources start adding them to your map one at a time. If your mind map editor doesn't support this feature you might need to copy them as text and not include images and videos or link them in a google drive on your canvas. Once that's done the next step is to analyze what you've got so far so walk through from start to finish and try to see if there's anything missing and whether everything makes sense. Now it's time to style it. Begin by coloring the text and adding a well blending background to make the structure stand out. You can use the following techniques to do so: 1. Heatmap - color the main node in the hierarchy a certain color (usually red) and each following generation should be a lighter (colder) color like yellow and after even blue or purple.  2. Category-based coloring - assign different colors to different categories of information. For example, use blue for facts, green for ideas, yellow for questions, and red for important points. This helps in quickly identifying the type of information at a glance.
 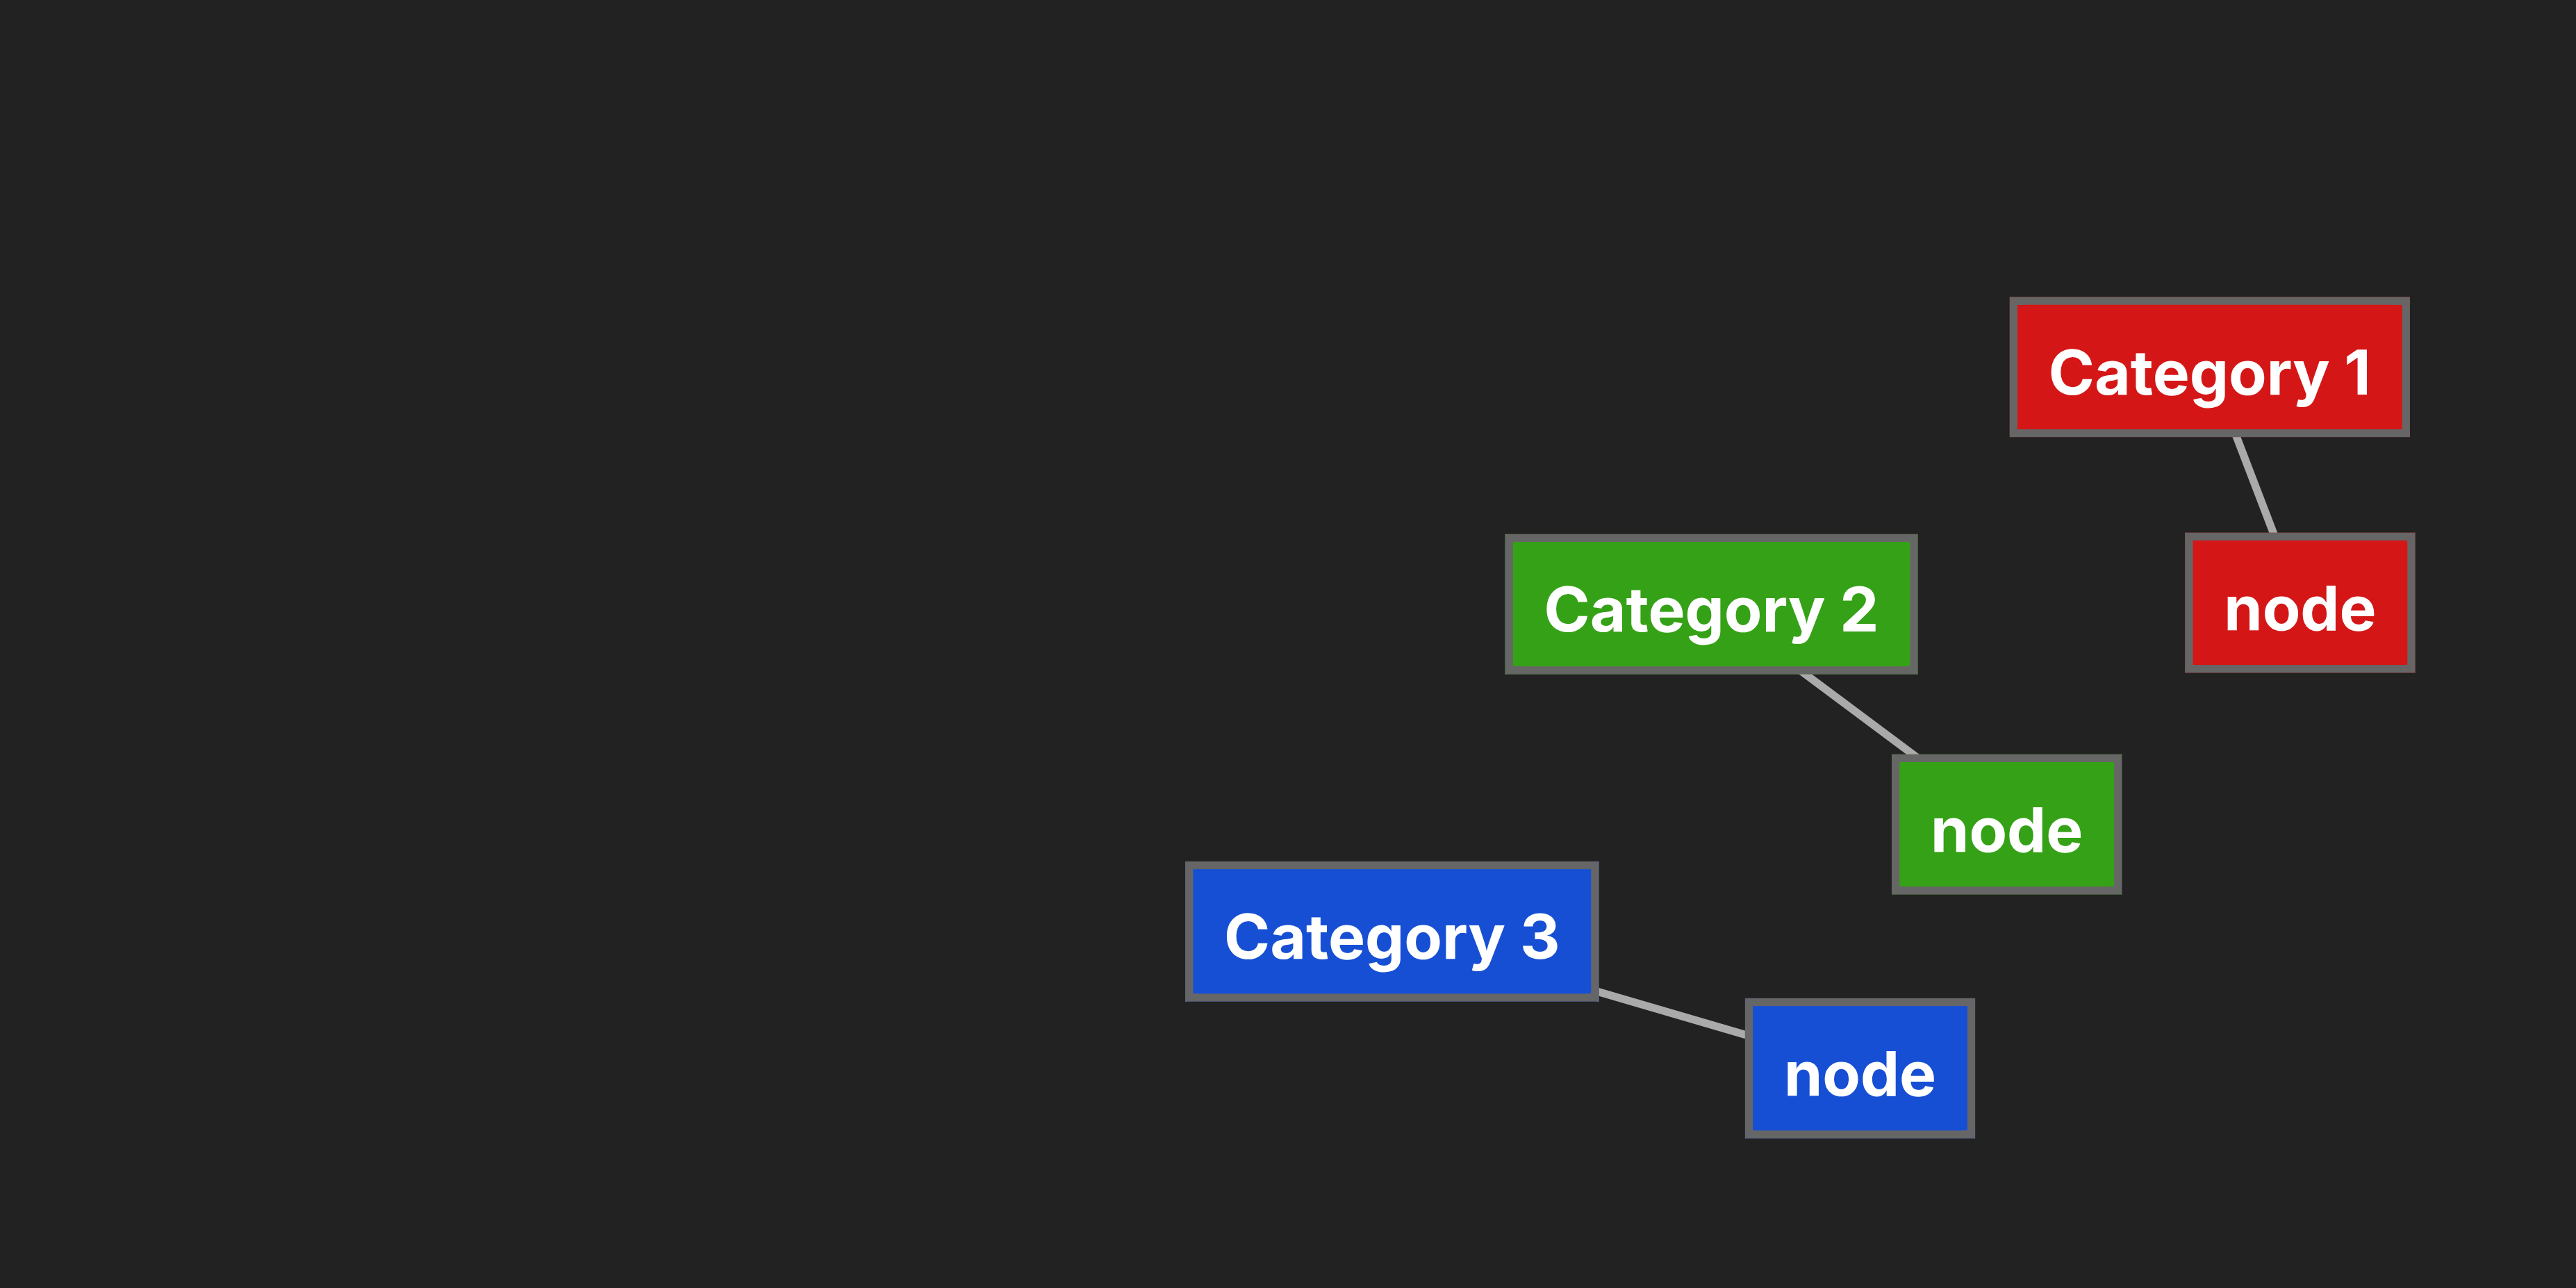 3. Branch population - vary the number of sub-branches under each main branch. Branches with more sub-nodes indicate areas rich in details or high importance, while those with fewer sub-nodes represent simpler or less critical concepts. This approach helps in creating a balanced map and directing focus to areas that need more development.
 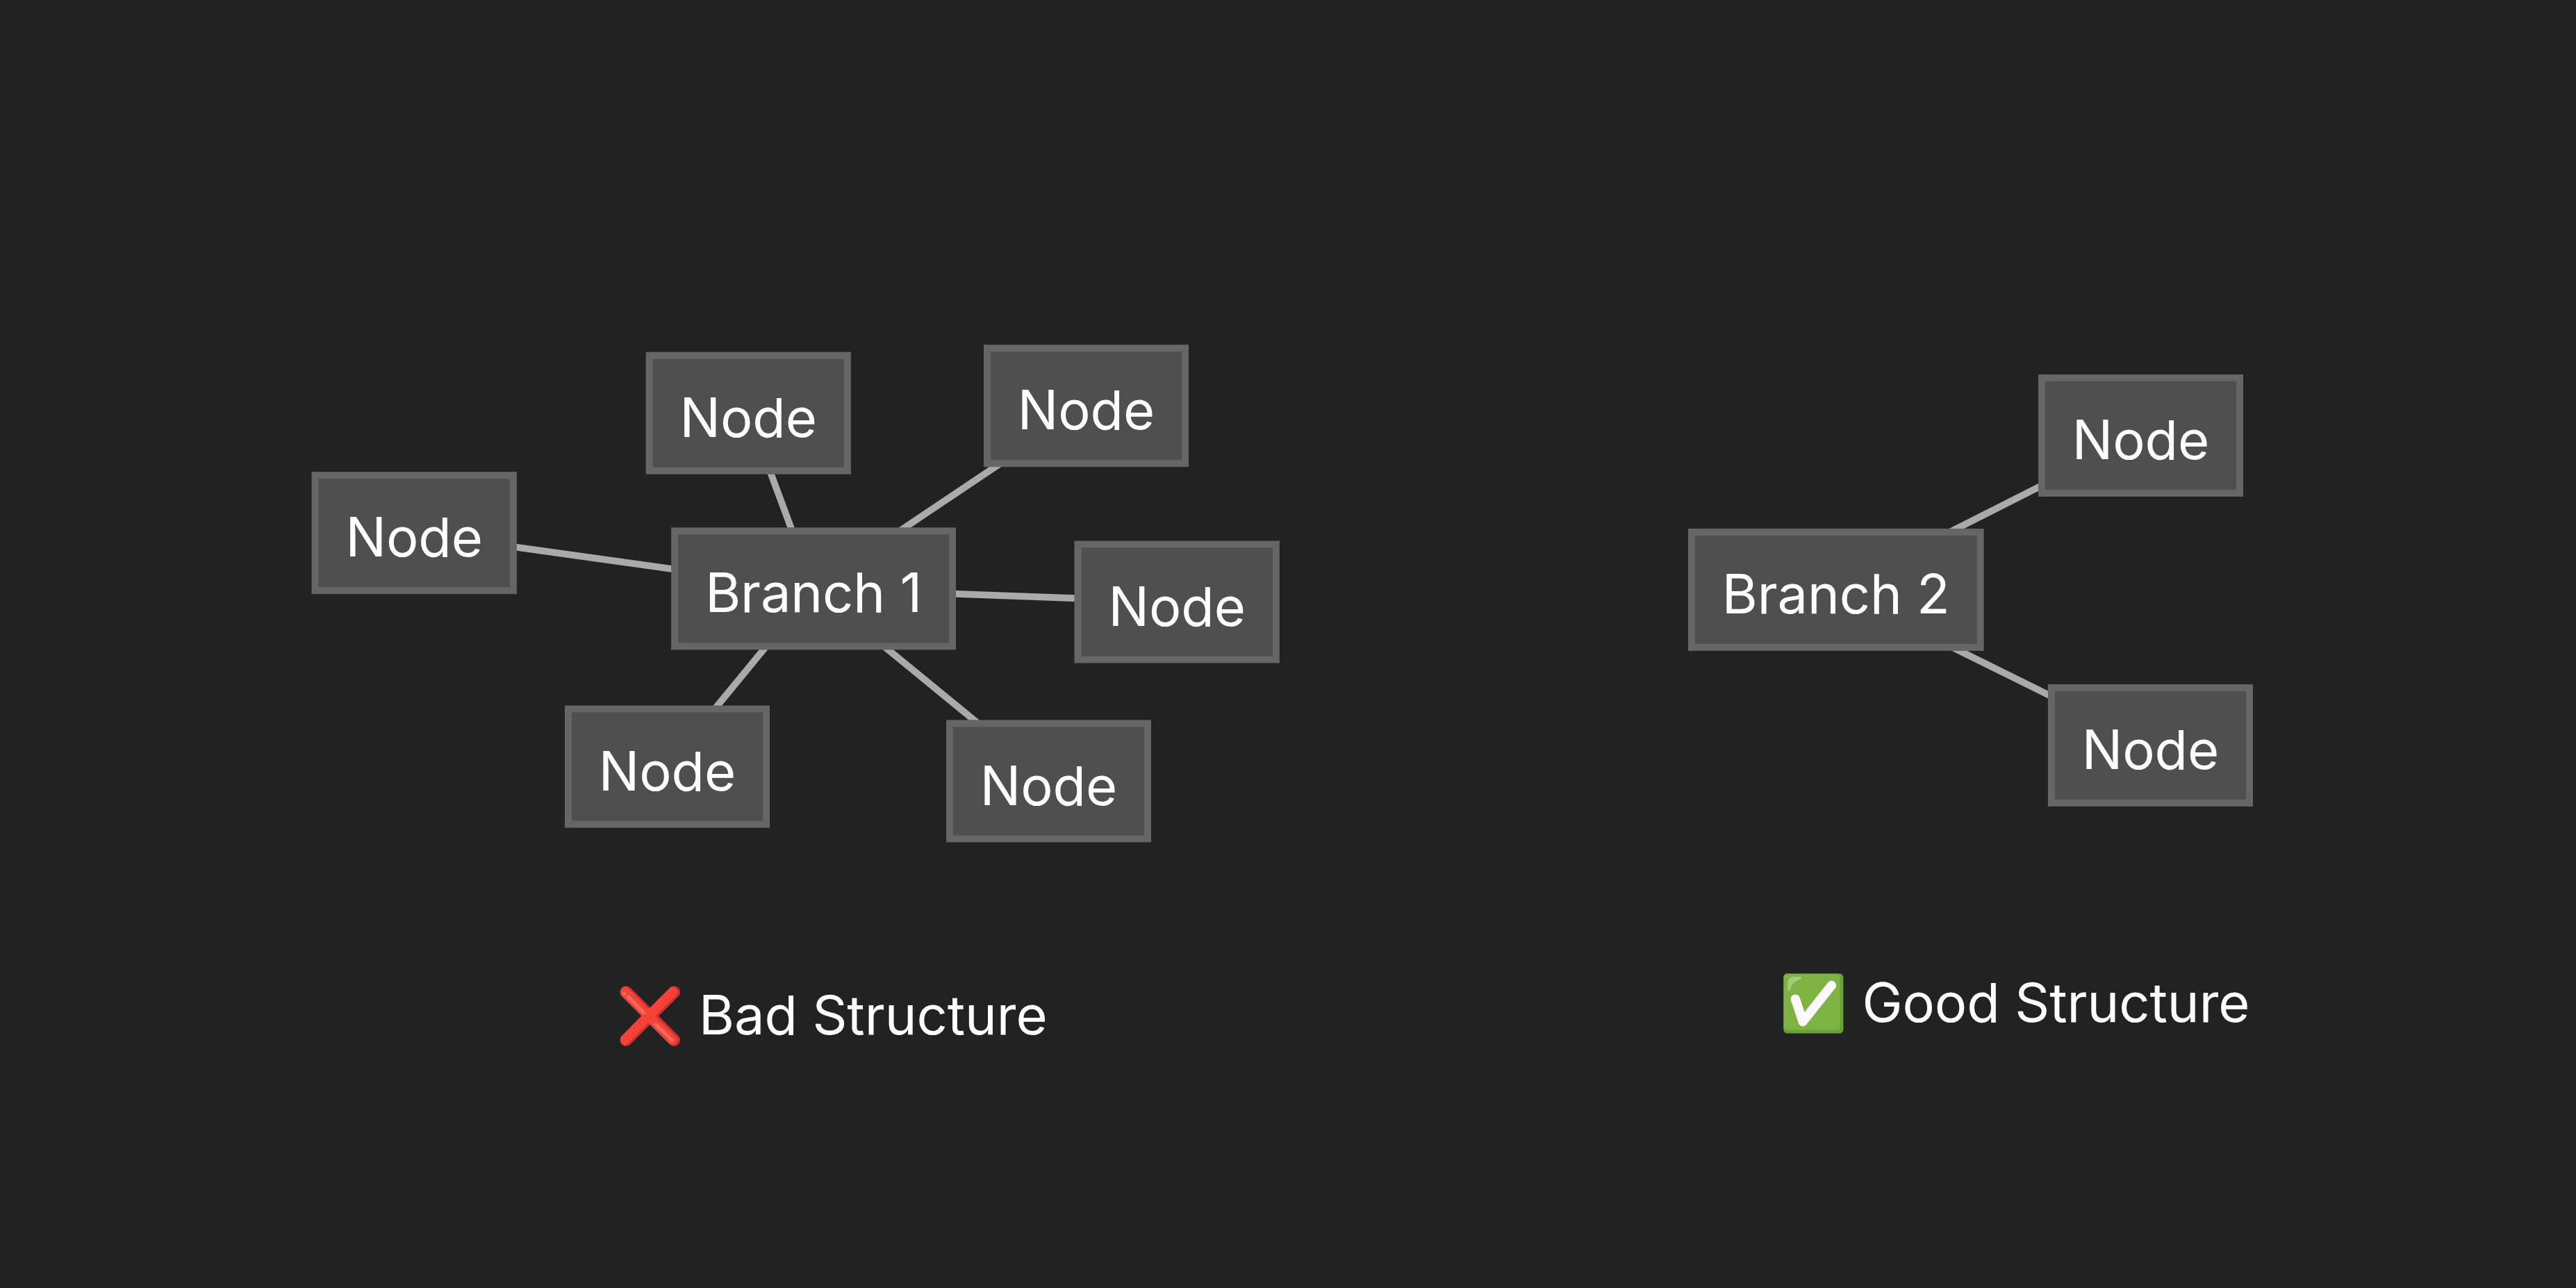 4. Icons and symbols - incorporate small icons or symbols next to nodes to represent concepts visually. For instance, a lightbulb for ideas, a book for references, or a clock for timelines.
  5. Fonts and sizes - vary the font sizes to indicate importance. The central node should have the largest font, with decreasing sizes for sub-nodes. Choose readable fonts that enhance the overall aesthetic.
  Beyond styling, there are several advanced techniques to elevate your mind maps. One key aspect is iteration and refinement. After creating an initial draft, review it critically. Ask yourself: Does this accurately represent the topic? Are there gaps in logic? Is the information balanced? Revise accordingly, perhaps by adding new branches or pruning unnecessary ones. Another advanced technique is cross-linking. In complex mind maps, create connections between non-adjacent nodes that share relationships. This can reveal unexpected insights and show how different parts of the topic interconnect. Mind maps can also be used for brainstorming sessions. Gather a group and have each person contribute ideas to the map in real-time. This collaborative approach often leads to more diverse and innovative outcomes than individual brainstorming. When it comes to digital tools, choose one that suits your needs. Free options like FreeMind or XMind offer basic functionality, while paid tools like MindMeister provide cloud syncing and collaboration features. Pathmind, for example, allows for embedding multimedia and creating interactive elements, making it ideal for educational purposes. Common mistakes to avoid include overcrowding the map with too much information, which can make it confusing. Stick to keywords rather than full sentences. Also, avoid using too many colors, as this can distract from the content. Ensure that the central idea is truly central and that all branches relate back to it. The benefits of professional mind mapping extend beyond organization. It improves memory retention by engaging both hemispheres of the brain. It boosts creativity by encouraging free association of ideas. It also enhances problem-solving skills by providing a visual overview of complex issues. In conclusion, making mind maps like a professional requires practice, attention to detail, and a willingness to experiment with different techniques. Start with the basics, gradually incorporate advanced methods, and always prioritize clarity and relevance. With time, you'll find that mind mapping becomes an indispensable tool for learning, planning, and creativity. Whether you're a student, teacher, or professional, mastering this skill can significantly enhance your cognitive abilities and productivity.